Bootstrap Checkbox Example
Overview
From time to time the most basic items might get really vital-- especially the moment you get to need them. As an example exactly how do your visitors interact with the webpages you create claiming a simple Boolean act-- simply yes or no pertaining to some of the questions you should ask, the way they do consent to the conditions or perhaps line up a handful of the achievable preferences they might have. We most likely get past this with no paying enough of an care to the feature responsible for such actions however the Bootstrap Checkbox Input is certainly a quite critical feature-- one our forms can't really do without.
Located in the current fourth version of the Bootstrap platform we are delivered with the
.form-check.form-check-label<div>.form-check.form-check-label<label><input>.form-check-inputEffective ways to employ the Bootstrap checkbox:
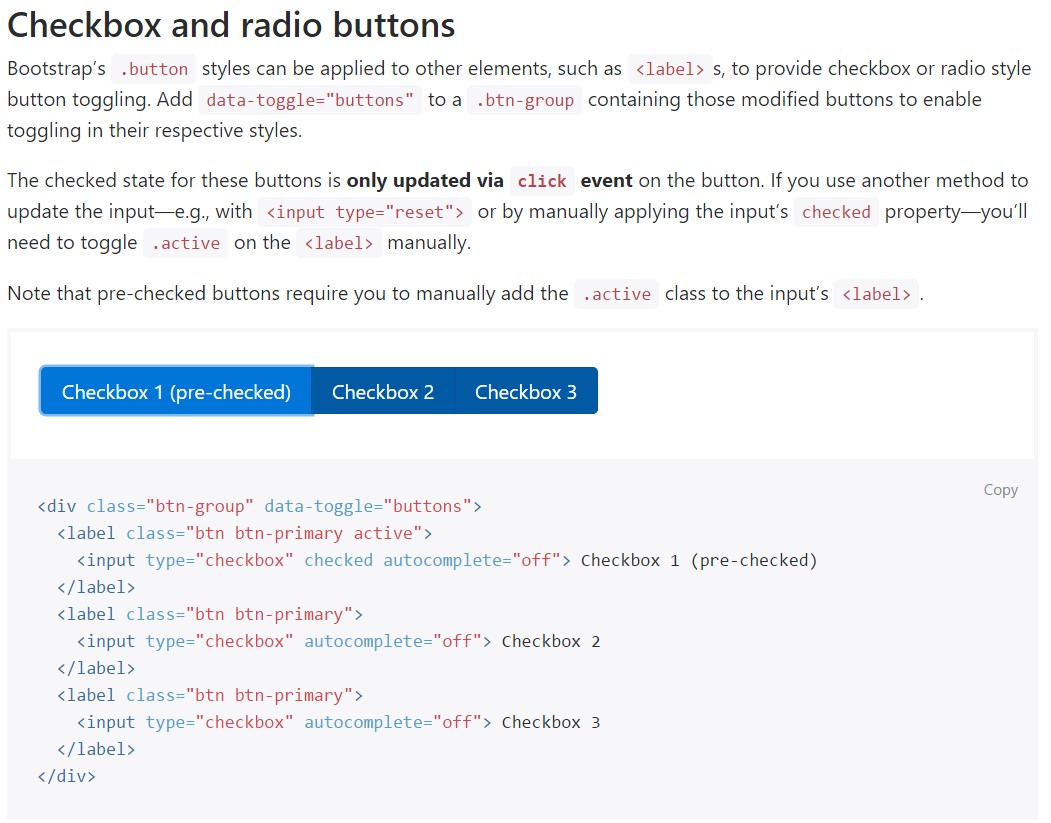
Bootstrap's
.button<label>data-toggle=" buttons".btn-group<input type="reset">.active<label>
<div class="btn-group" data-toggle="buttons">
  <label class="btn btn-primary active">
    <input type="checkbox" checked autocomplete="off"> Checkbox 1 (pre-checked)
  </label>
  <label class="btn btn-primary">
    <input type="checkbox" autocomplete="off"> Checkbox 2
  </label>
  <label class="btn btn-primary">
    <input type="checkbox" autocomplete="off"> Checkbox 3
  </label>
</div>
Once in a while we want to have the checkboxes to be inside our forms without the customer truly having the ability to take some practice selecting them-- that is actually where exactly the disabled option shows up.
In order to disable efficiently a checkbox in Bootstrap 4 using the standard HTML attribute
disabledIn the event that you enjoy the tip and in fact want to work on this you really should appoint the
.disabled.form-checkAnother good example
Anytime you are utilizing checkboxes, wrap all of them in a
<label>.custom-control.custom-checkboxApply
.custom-control-input<input>Also use two
<span>.custom-control-indicator.custom-control-description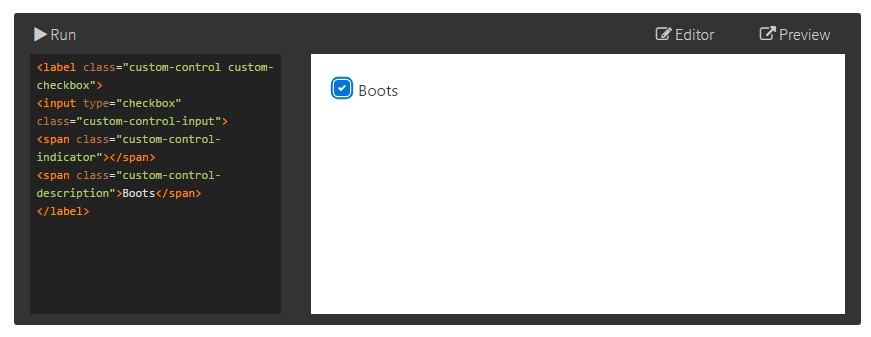
<label class="custom-control custom-checkbox">
<input type="checkbox" class="custom-control-input">
<span class="custom-control-indicator"></span>
<span class="custom-control-description">Boots</span>
</label>
Bootstrap Checkbox Input forms
Default radios and checkboxes are greatly enhanced upon with the aid of
.form-checkThe disabled class is going to also light up the text message color to help signify the input's state.
A brand new element for the Bootstrap version 4 framework is the release of the so called custom-made form features. These are actually the same components we are known in performance but styled far more appealing and in the Bootstrap manner. By using them you can provide special taste as well as personality to your material by simply just specifying a few extra classes to the commands you incorporate in your forms.
To employ customized checkboxes wrap them inside a
<label>.custom-control.custom-checkbox<input>.custom-control-input<span>.custom-control-indicator.custom-control-descriptionFinal thoughts
That's pretty much all you require to do in order to place a checkbox element inside your Bootstrap 4 powered website page and put in a number of customized flavor to it bring in it a tasteful looks. Right now everything you have to do is repeat the drill before you have actually checked all of the checkboxes required are already on the page.
Examine a number of online video guide regarding Bootstrap checkbox
Connected topics:
Bootstrap checkbox formal documentation
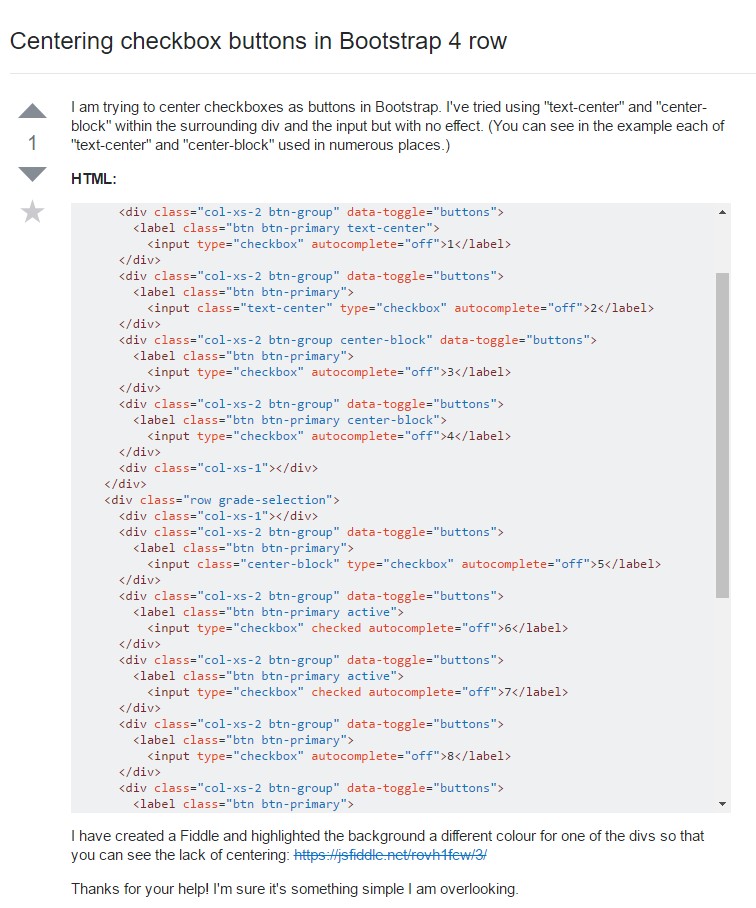
Centering checkbox buttons in Bootstrap 4 row
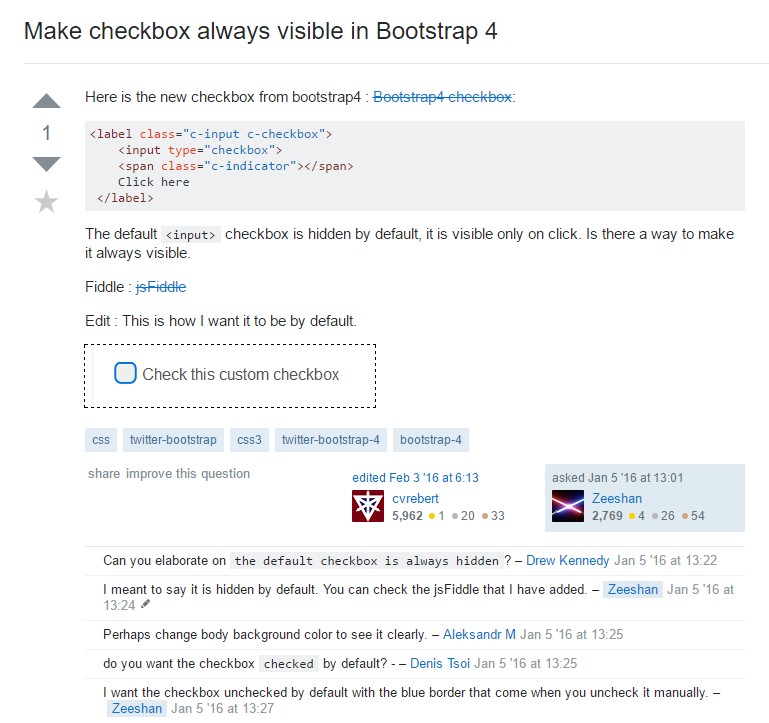
Make checkbox always visible in Bootstrap 4